31 Aralık 2012 Pazartesi

Balls Of Fire!

To contact us Click HERE


Spicy flaming hot little meatballs!
     Meatballs of any kind are some of the most popular hors d'oeuvres for a New Years Eve party that there is.  People like meatballs, especially at a cocktail party.  Football fans that throw a bowl game party or playoff game party almost always offer meatballs to their guests.  Usually party hors d'oeuvre meatballs are Swedish Meatballs or Italian Meatballs and there are actually people who think that those two styles of meatballs are the only kinds of meatballs that there is in the world!     I have posted recipes for traditional Swedish, Italian, Arabic, Moroccan and Chinese meatballs in this food blog so far and there are many more traditional meatball recipes yet to go.  Today I decided to create a very spicy meatball recipe that surely will give the spiciest hot chicken wing recipe a run for the money.       First of all, the red saucy coating on these meatballs is the mildest part of the recipe.  Only mild paprika and organic red food coloring was used to give the meatball coating sauce its red color.  Paprika is as mild as chile peppers get.  I do realize that it the mild red meatball coating is diabolically deceptive, but that is part of the fun of the hot chile pepper game.       When somebody picks up one of these meatballs by the toothpick and cautiously tastes the red coating before biting into the meatball, their first thought will be that the meatballs are not spicy at all.  Then when the meatball is popped in the mouth with confidence that it will not be spicy hot and the chomping starts, that is when the fire alarms start going off!  It is not the sauce that makes these meatballs spicy hot.  It is the spicy hot ground chile peppers that are mixed in with the ground beef that makes these meatballs taste like incendiary devices.  The ground beef is what is spicy hot and that is how a spicy meatball should be! 
     Balls Of Fire:     Some of the dried chile peppers in this recipe are a little bit hard to find in the form of a ground powder (chile molido).  These peppers are easy to find as dried whole chile peppers.  Mexican markets are the best place to find any kind of dried hot chile pepper.  A spice grinder, food processor or a Turkish coffee grinder can be used to grind whole dried chile peppers into powder.     Place 8 ounces of ground beef in a mixing bowl.     Add white pepper.     Add sea salt and black pepper.     Add 1/4 teaspoon of ginger powder.     Add 1/4 teaspoon of garlic powder.     Add 1/2 teaspoon of Spanish paprika.     Add 2 dried habanero peppers that are ground.     Add 3 chile arbol that are ground.     Add 1/2 teaspoon of ground chile pequin.     Add 1/2 teaspoon of New Mexico chile powder.     Add 1/2 teaspoon of Chinese chile powder.  (Ground dried red serrano or chile japones)     Thoroughly mix the ingredients together.     Refrigerate the spicy ground beef mixture for 1 hour, so the ground dried chile peppers color the ground beef red and so the chile pepper powder releases its flavor.       Divide the spicy ground beef mixture into portions that weigh 3/4 ounce apiece.  (3/4 ounce is about 21 grams.)     Roll the ground meat portions into smooth round meatball shapes.     Place the spice meatball in a roasting pan.     Bake the meatballs in a 350 degree oven, till they become fully cooked and very lightly browned.  Be sure to shake the pan occasionally, so the meatballs do nor stick to the pan!     The coating sauce can be made while the meatballs bake!     Place 1 tablespoon of Spanish paprika in a a small mixing bowl.     Add 1/3 cup of water.     Add 1/2 teaspoon of rice vinegar.     Add 1/2 teaspoon of vegetable oil.     Add sea salt.     Add 2 drops of concentrated red beet juice food coloring or 2 drops of regular red food coloring.     Stir the ingredients together.  The paprika will reconstitute and thicken the sauce.     When the meatballs become fully cooked, place them in the mixing bowl with the coating sauce.     Gently toss the meatballs with the sauce, till they become coated.     Decoratively drizzle streaks and drops of your favorite green, orange and red colored hot sauces on a plate.     Spear the balls of fire with toothpicks and place them on the plate.
     Balls Of Fire is an appropriate name for this hors d'oeuvre meatball recipe!  The first meatball that is consumed will give most people a nice little endorphin rush from the spicy heat.  These are some flaming hot balls of fire!  Yum!  ...  Shawna  

Beef Bourguignon (Beef Burgundy) - Pressure Cooker Style

To contact us Click HERE
During Spring/Summer, our Weber grill gets quite a workout. Alas, our outdoor grills are tucked in for our California winters. Our tomato plants are spent, and our small herb and vegetable garden is looking a bit sparse.  Sigh. 


Our thyme and marjoram are still hearty, this time of year, and they don't go to waste in the kitchen. It soups & stew season, and I'm ready!


Now that the days are chillier, with much needed rain, my Dutch oven is being put to a lot more use. This is the time of year, when I become a lean and mean "Searer" and "Braiser".  The aroma of a savory stew, wafting from the kitchen, is comforting. My Perfect Pot Roast recipe  rules as one of the most appreciated slow-cooked dinners that I make.  Cooking an inexpensive cut of beef, in a braising liquid,  for a long period of time yields tender meat and a succulent sauce.  Drool. 


Last week, I had a craving for Beef Burgundy -- aka "Beef Bourguignon".   I couldn't stop thinking about the first time I had this dish, at a catered party.  I really wanted to recreate this stew, with it's rich and flavorful sauce.Visions of Julia Child, popped into my head.  I've never read-- let alone, made --the esteemed Julia's recipe-- and  I assumed her recipe would be a lot of work.    Still, it was 1:00 in the afternoon and I had Christmas cookie dough to make. I realized that I didn't have the time to make this classic French stew and I needed my oven!  The slow cooker was out-- and then it hit me.

Pressure cook it!  I know, I know... pressure cookers scare a lot of newbies.  There is a fear of an explosion.  I tell you the truth-- It's an unfounded fear.  My first pressure cooker was a stovetop model, with the regulator (that "thingie" that rocks back and forth with a chhh-chhh-chhh sound).  Not once, did I have an explosion.


About 9 years ago, I invested in an electric digital pressure cooker, and I love so many features of this model.  Mine has a browning cycle, and a non-stick removable insert and I love it's oval shape. The brand is "Cook's Essentials" and I bought mine from QVC.  I see that the newer model is completely different than mine, and has less stellar reviews.   The day mine breaks, I would buy a 5-quart model all over again.

Don't worry. If you don't own a pressure cooker, you can make this in a Dutch oven.  If you want to make this in a slow cooker-- I beg you to not do one thing that makes my skin crawl. Please, don't throw in raw meat!  To me, the best tasting stews come from taking the time to sear and brown the meat, first. All that beautiful brown crusty build-up, in the pan is what gives the sauce great flavor.

Pinkie promise?  Thank you. I'm not gonna lie. It takes about an hour to get the stew ready.  Enough talking-- I'll show you how I made this:

First, we build flavor. I keep frozen bacon, so it's easier to cut into "lardons".  In a heavy skillet, cook the bacon until crispy. Remove with a slotted spoon onto a paper towel lined plate. Set aside.

Finely chop 2 fresh carrots. Yes, I took a shortcut and let my food processor do the work.  Clean and quarter one pound of fresh white mushrooms.

Pearl onions are traditional in this stew.  Peeling them takes work, so I used frozen onions. I simply rinsed them, shook them dry and then sauteed them until they were lightly golden.

I then added 2 cloves of minced garlic for the last 30 seconds, removed the onions and set those aside.

In the same pan, add a little olive oil and saute the carrots for 2-3 minutes-- just until soft. Remove and set aside.

When you buy stewing meat, ask your butcher about Chuck Eye Roast. I pay about $7.00 a pound, but it's worth it. Seriously.  It's the perfect meat for stewing, and is far more tender than buying "stew cut meat". With stew cut meat, you don't know what the butcher has thrown together, and I've had my fair share of chewy stew.

I cut the meat into bite-size pieces and make sure that it's dry. Season the meat with salt & pepper and flour and toss together to coat evenly.


In the same pan that I cooked add a little vegetable oil, and bring the pan to medium-high. Open up the windows and turn on your vents.  We're about to do some seriously searing.  The key to searing is to get the pan very hot. Don't crowd the meat and leave it alone for 2-3 minutes.  If you keep moving the meat around, you won't get the sear = less flavor = bummer.  It took about 3 batches to get all the meat nicely browned. Pile the seared meat into a big bowl.

I then added a heaping tablespoon of tomato paste, and stirred it around the dark "fond" that was built. Now, we're going to "deglaze" with 1-1/2 cups red wine. I used burgundy, but any kind of red wine will do.  Scrape the pan and stir the liquid around, loosening up the brown bits.


Add the carrots and bacon, and give it a stir.
Add one cup of beef broth and one tablespoon of Worcestershire sauce (my not-so-secret flavor builder).

Add the browned beef into you Dutch oven, slow cooker or pressure cooker. Pour the sauce over it.

Tie a few springs of fresh marjoram and thyme (thyme only will do) and nestle it into the stew.
In a Dutch oven, place into a 275 degree oven for 3 hours or simmer on low on the stove top.
-or-
Slow cook for 6 hours, on low.
-or-
Pressure cook for 40 minutes! Yes, 40 minutes.

Meanwhile prepare the mushrooms:
Clean the same skillet, and on medium heat, melt the butter and oil until bubbling.
Add the cleaned and dry mushrooms and saute the mushrooms for about 5 minutes— shaking the skillet intermittently until the mushrooms are lightly golden (about 7 minutes total). Remove from the skillet and set aside.

The pressure cooker beeped, and it's time to release the pressure.  (My cat doesn't like this part, and she skedaddles.)

The stew is bubbly hot, and smells so good! Remove the herb bundle with tongs, as it's done it's job.


Add the mushrooms, and onions.
For the pressure cooker, seal the lid again and pressure cook (on high) for 5 minutes more. Release the steam, and the stew is ready. For a Dutch oven or slow cooker, allow to cook for about 15 minutes more.
Toss in some chopped fresh parsley and serve. NOTE: if you prefer a thicker stew, I made a slurry of cornstarch and water and carefully whisk it in; simmer until thickened. However, I didn't need to do that, this time.
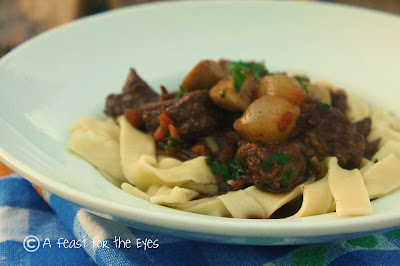
Traditionally, this stew is served with steamed potatoes. I was craving egg noodles. Um, I didn't have any... so I made my own.  (Yes, I can be an over-achiever at times.) I didn't document how I made the noodles, but I'll do it again and save that for another post.
The meat was buttery tender, the sauce had a rich flavor with notes of red wine.  The next day, it tasted even better.  I would serve this at a dinner party, and am sure that my guests would love it.
So, after I made this stew I quickly wrote down how I created it. Out of curiosity, I did an internet search to see if I could find Julia Child's recipe.  I did a fist pump, realizing that my version was very similar to hers. Wow!  
I would like to thank Barbara, of Pressure Cooking Today, for featuring this post on her wonderful blog. Barbara has a lot of mouth-watering recipes and valuable information about pressure cooking. If  you've been thinking that you "might" want a pressure cooker, I encourage you to just do it! Thanks to Barbara, I am using my PC to make mashed potatoes in 6 minutes. I can cook beans in a fraction of the time it takes to do it on a stove. Soups... rice pudding... it's like a microwave, only better (and healthier).  
A printable recipe card is at the end of this post. If you can't view the recipe card (Internet Explorer uses are having problems with this, click here.)


Apparently Size Doesn’t Matter for Prime Rib "Method X"

To contact us Click HERE
This is what our 6-pounder looked like. Would a
20 pounder work as well? Spoiler Alert: Yes.
The most common question after we posted our now famous“Method X” for making perfect prime rib was “will this work with much bigger,full-size roasts?” Since I'd only used the method on smaller specimens, I washesitant to green-light much larger pieces of beef without having tested itmyself.

Well, thanks to Bill in Salt Lake City, we now have visualproof that this great technique does work on the big boys. Here’s what thefearless cook had to say:

“Your recipe does indeed work on larger bone-in prime rib roasts. I followed the recipe to the tee, onthree 18 to 21 lb. roasts using three different ovens in three separate skicondo ovens, all with different thermostats. All came out perfectly. I had 29very pleased snowmobilers!”
As everyone knows, there are few groups harder to pleasethan a bunch of starving, probably drunk snowmobilers, so this must have really beenamazing. Below you’ll see pictures of Bill’s fine work, along with the videoshowing this easy method. By the way, after seeing the size of Bill’s slices,if you ever get invited to one of his prime rib dinners, you shoulddefinitely go. Thanks for sharing, Bill!

IMPORTANT NOTICE: Prime rib is very expensive, so no matter what method you use (traditional or Method X), you should always have a probe-style thermometer inserted so that the internal temp can be monitored, to avoid any chance of over-cooking. Set the probe alarm (125 F. for medium-rare) just in case, and pull the roast from oven even if there's still time left on the timer.


To read the full post, which includes the exact time/tempformula, click here. Enjoy!Pin It Now!

Garlic & Blue Cheese Green Bean Almondine – I Just Couldn’t Do It

To contact us Click HERE
When I went to culinary school in the early Eighties, thechef instructors used “Green Beans Almondine” as a prime example for the kindof stodgy, clichéd, faux-fancy, vegetable side dishes that we were supposed toeradicate shortly after graduation. 

This was the dawn of a new age of Americancookery, and something so old-fashioned as green beans almondine had no placealong side our newfangled raspberry vinaigrettes and cajun fish.

There was only one problem with this prohibition...greenbeans and almonds tasted really good together, and made for a lovely side dish once ina while. Of course, fearing you’d be laughed out of the young, hot cooks club(hot from heat, not from hotness) you just didn’t dare make or serve such adinosaur.
Anyway, to make a long story short, I’ve finally done agreen beans almondine video, but added roasted garlic and blue cheese to it,just in case any of my old classmates are watching.  I actually did this at Thanksgiving, sans nuts, and it gotrave reviews, so I had a feeling the addition of the slivered almonds wouldwork just fine, and they did! I hope you give this a try soon. Enjoy!

Ingredients for 4-6 portions:
1 pound green beans, blanched in boiling, salted water untilalmost tender3 heads garlicolive oilsalt and pepper to taste cayenne to taste1/3 cup sliced almonds browned in 1 tsp butter2 oz Pt. Reyes blue cheese, or other blue cheese400 degrees F. for 15 minutesPin It Now!

Brazilian Feijoada – Happy (and hopefully very lucky) New Year!!

To contact us Click HERE
We’ve posted about this before, but there’s a great,southern tradition of eating beans and greens on New Year’s Day to ensure goodfortune in the coming year. 

Apparently, by eating “poor” the first day of theyear, you align certain cosmic forces in your favor, which results inprosperity and good luck the rest of the year. Sounds crazy, right? I know, you’re way too sophisticated tobelieve in such lame supernatural shenanigans. Hey wait a minute…don’t youwatch all those ghost hunter shows on cable TV? Busted! Hey, did you hear thatnoise?

Anyway, whether you believe in this kind of culinary clairvoyanceor not, this Brazilian feijoada is one of the world’s great stews. Thetraditional good luck bean is the black-eyed pea, but here we’re celebratingthe delicious, and very nutritious, black bean.

I tried to be clear in the video that this is just myversion, and not some attempt at true feijoada authenticity, whatever that is.As long as you have black beans, and LOTS of smoked, salted, dried, and/orcured meats, you are well on your way to some kind of feijoada-likeawesomeness.

In case you’re wondering, all I did for the greens was boilsome kale in salted water until tender, and then sauté briefly in olive oil andgarlic. It pairs perfectly with the white rice and rich stew, and while I can’tguarantee a year’s worth of wealth and good luck, I can promise you a deliciousbowl of food. Happy New Year to all of you, and as always, enjoy!


Ingredients for 6 portions:
1 pounds dry black beans, soaked overnight
2 quarts water, plus more as needed (add more whenever stewlooks too dry)
1 bay leaf
2 smoked pork chops
12 oz linguica
8 oz Italian sausage
4 oz smoked bacon
3 oz dried beef
1 onion
6 cloves garlic
1 tsp cumin
1/2 tsp coriander
salt and pepper to taste
For the crumbs:
1/2 cup breadcrumbs
1 tbsp olive oil
2 tsp grated orange zest
2 tbsp chopped Italian parsley

Basic steps:
- Soak beans overnight, add to pot with bay leaf, beefjerky, and any bones
- Simmer for 1 1/2 to 2 hours, or until beans are cooked,but very firm
- Add onion mixture and meats, and simmer for another hour,or until beans are very soft
- Add a splash of water at any point during the cooking ifstew looks too dry
- Test and add salt near the end, depending on saltiness ofmeatPin It Now!

27 Aralık 2012 Perşembe

Rosemary Honey “Pull Apart” Dinner Rolls - Because You Love Them...Right?

To contact us Click HERE
Entertaining during the holidays usually means plenty ofcostly, complicated, and time-consuming recipes, so absolutely no one would blame you ifyou simply tossed a tube of store-bought dinner rolls into the oven to save alittle time and effort.

Of course the problem with that, at least for loyalfollowers of this blog, is that some or all of your family members will haveseen this video by then, and you may get a few looks. Not that they would neverquestion your undying love and devotion to their happiness, but hey, why take a chance?
Assuming that you have an electric mixer, besides a fewminutes of cutting and balling the dough, these really aren’t that much work tomake. If you don’t, and would have to knead this by hand, then let yourconscience be your guide. I think I speak for your entire family when I say, weknow you’ll do the right thing.
Anyway, as far as holiday dinner rolls go, these are prettylean. You can certainly up the melted butter amount, and toss in a egg or two,but since these are generally going to be eaten with fairly rich food, I prefer a lighter approach.
Please feel free to embellish with anything else you’d liketo toss in. I’ll toss out garlic, herbs, cheese, seeds, and nuts just to startthe brainstorming session. I hope you come up with something amazing, and givethese a try soon. Enjoy!

Ingredients for about 32-36 small dinner rolls:
1 packet (2 1/4 teaspoon) dry active yeast1/4 cup warm water (100-110 degrees F.)1 cup milk4 tablespoon unsalted butter1 or 2 tablespoon honey1 teaspoon salt2 tsp minced fresh rosemary leavesabout 3 cups unbleached all-purpose white flour, plus moreif needed (NOTE: add about 2 1/2 cups of flour at the beginning of the mixing,and then add more in smaller increments until the dough just starts to pullaway from the bowl. Remember, you can always add more, but can’t remove toomuch! Better a little too sticky than too stiff and dry.)
2 tbsp olive oil (to oil the dough) egg wash (one egg beaten with a teaspoon of milk)coarse sea saltPin It Now!

We Won! Food Wishes Takes Down Two Taste Awards

To contact us Click HERE
Thanks to you, we're happy to announce that Food Wishes haswon two Taste Awards! We were a finalist in two categories, “BestFood Program: Web,” and “Best Home Chef in a Series,” and took home bothprizes.

A sincere thank you to everyone who took the time to vote.I’ve said it before, but no food blogger anywhere enjoys such overwhelmingsupport from their audience. You're the best!Pin It Now!

Classic Lobster Bisque – Finally!

To contact us Click HERE
I usually don’t have a good answer for why I’ve not gottenaround to filming certain iconic dishes like risotto, beef Wellington, and puffpastry; but when it comes to lobster bisque, I do have a great excuse.

I won’t bore you with the details of how the traditionstarted (translation: I don’t remember), but for as long as I can remember,I’ve always made lobster bisque on Christmas Eve, to celebrate my sister-in-lawJennifer’s birthday.

And since the few days leading up to Christmas are always sobusy and hectic with shopping, cooking, and travel, I’ve just never felt likeI’ve had the time to set up the camera to properly film the procedure. Well,this year I decided to give it a go, and despite all the aforementionedchallenges, I was very happy with how this came out.

One word of warning: this recipe requires live lobsters,brandy, and heavy cream. If you can’t get, or don’t want to use thoseingredients, then you’ll have to make something else. Sorry, but this recipe istoo sacred for substitutions.

Speaking of live lobsters, I know many are skeptical thatthese “bugs” can actually feel pain, but to play it safe, I recommend puttingthem in the freezer for 20 or 30 minutes to knock them out cold before theirultimate demise.

I only showed the cracking and the picking of the lobster meatvery briefly, as this video was already too long for my tastes, but below I’lllink an additional tutorial that show this in more detail. Yes, this soup takesa little bit of work and expense, but I think you’ll agree with me (andJennifer) that all the effort is well worth it. Enjoy!


Makes about 1 1/2 quarts:
2 live lobsters (about 1 1/2 pounds each)
1 onion, chopped
2 rib celery, chopped
3 quarts cold water (this will reduce by about half duringthe entire cooking process)
3 cloves garlic
4 springs fresh thyme
1 bay leaf
1 cup crushed tomatoes
1/4 cup tomato paste
2 tsp paprika
1/3 cup white long grain rice
2 tbsp cheap brandy (inexpensive brandy tends to be a littlesweeter, and works well here)
1/2 cup heavy cream, or more if you like it creamier
salt and cayenne to taste
1 tbsp chopped tarragon to garnish

Bonus Lobster Meat Recovery Video: 
This video shows the picking of the lobster meat in muchmore detail than I did. Since they are boiling the lobster, you can just skipto the part where he is liberating all the meat. For more general lobster info,you can also check out this page on Allrecipes.
Pin It Now!

Because Oyster Rockefeller Sounds Rich

To contact us Click HERE
There’s much debate over how many of America’s greatestrecipes got their name, but that’s not an issue with Oyster Rockefeller. Thanksto the rich, money-colored butter sauce, this decadent creation’s name prettymuch wrote itself.

Besides the obvious, superficial reasons, associating yournew shellfish appetizer with the most affluent family of the day was a strokeof social media genius. Hey, just because Twitter wouldn’t be invented foranother 107 years doesn’t mean people didn’t “retweet” things.

When Jules Alciatore invented the dish in 1899, he wasn’ttrying to create a classic, new American shellfish appetizer; he was simplytrying to replace snails in his diet. That’s right, what would become America’sgreatest seafood appetizer (sorry, crab cakes) was just a delicious work-aroundfor a serious shortage of French snails in New Orleans.

To say the customers of Antoine's were happy with this localsubstitution would be a huge understatement. They went crazy for it. The dishquickly gained national attention, with the most famous celebrities,politicians, and foreign dignitaries of the day stumbling over each to get aplate or three.

The original secret recipe really is a secret; so allversions, including mine, are just guesses. There is agreement among foodieswho study such matters that spinach was not part of the formula, but the muchspicier and more flavorful watercress was used.

Neither were mushrooms, bacon, ham, cheese, garlic, or any otherlater day add-ons. Not that those ingredient aren’t good baked on top ofoysters, but that just wasn’t how Mr. Alciatore rolled. So if you are lookingfor a special occasion appetizer that tastes, looks, and makes you feel (andsound) rich, then I hope you give this oyster Rockefeller recipe a try. Enjoy!

Makes enough for about 3 dozen oysters Rockefeller:
1 stick butter (1/2 cup) room temp
2 tbsp minced green onions, white and light green parts
2 tbsp diced celery
2 tbsp fresh chopped tarragon
2 tbsp fresh chopped Italian parsley
1 cup chopped watercress leaves
salt, pepper, and cayenne to taste
2 tbsp Pernod liquor
1/4 cup bread crumbs
3 dozen oysters on the half shell

Bonus How to Open Oyster Video!

My friend Tamar, from Starving Off the Land, does a much better job of showing how to open oysters, but that’s only because she raises them and gets a lot more practice! That, and she’s better at it. Also, a special thanks to Sky Sabin Productions for their fine work on this.

For some additional shucking info, and tons of oyster recipe links, you can also check out this article on Allrecipes.com. Enjoy!
 
Pin It Now!

Merry Christmas!

To contact us Click HERE
Photo (c) Flickr user kevindooley
Michele and I wanted to wish all of you who celebrate, avery Merry Christmas. Hopefully you’re surrounded by the people you love,and/or a ton of great food. 

We have a new video posting on Thursday, but untilthen I’m going to try and take a few days off from staring at the omnipresent computer.Seasonal apologies for any lags in responding to comments or emails. Enjoy therest of your holiday!Pin It Now!

20 Aralık 2012 Perşembe

Christmas Hamlets – To Eat or Not to Eat Will Not Be a Question

To contact us Click HERE
I had been fantasizing for weeks about doing a whole,home-cured ham for the holidays. I always get lots of requests for this kind ofthing, and was fully prepared to give it a go, but then a strange thinghappened, I heard the word “Hamlet.” 

It was on TV, and completely unrelated tocured pork, but for whatever reason the word made me think of cute little,individually sized hams. That’s all it took, and off I went trying to figure out howto make this thing happen. I knew I wanted a process that wouldn’t require thepink curing salts used in commercially produced hams, not because they areunhealthy, they’re not, but because it would be hard for some of you to find.

I’ve read things in the past about using celery’s naturallyoccurring nitrates to accomplish the same thing, so that’s what I used, and asyou’ll hear me say several times in the video, I was thrilled with the results!While not exactly like a classic city ham, this was very close. The firm, moisttexture was great, the salt level was spot on, and since we used loin insteadof leg, there’s even a little less fat.
I’m afraid I won’t be able to help much with questions abouthow to do this with bigger or different cuts, as this was my first foray intohome-cured ham, so if you are going to attempt this, please go to a goodbutcher to get the exact same size “chops” that I used. If you do, and followthese simple steps, I think you will have a holiday meal “to die for.” Sorry, but you didn’t expect me to do this entire post without one forced reference tothe play, did you? Enjoy!

Ingredients for 4 Hamlets:4 thick-cut (10-12 oz) center cut, boneless pork loin“chops”For the brine:1/2 cup *kosher salt plus 1 tablespoon (*if using fine table salt, you’d only need barely 1/3 cup)3/4 cup packed brown sugar1 tsp finely ground black pepper1 tsp allspice1/2 ground cloves1 bay leaf1 1/2 cups boiling water to dissolve salt and sugar3 celery stalks (about 2 cups chopped)1/2 yellow onion3 cloves garlic2 cups cold water to puree vegetables in blender, plus addenough cold water to make 2 quarts total volume of brineBrine for 48 hours before roasting
For the glaze:1/4 cup packed brown sugar2 tbsp Dijon mustardpinch of cayennewhole cloves as needed
Roast at 325 degrees F. until an internal temp of 145degrees F. is reached.Pin It Now!

Potato Pancakes – Delicious, But They Go Right to My Thighs

To contact us Click HERE
There are few foods I enjoy eating more than a plate of crispy-edged potato pancakes. Unfortunately, I've been trying to limit my carbs lately (I just can't let go of my dream to become a famous underwear model), so seeing all these amazing Latkes recipes that pop up during Hanukkah is really hard.

Anyway, just because I'm not partaking doesn't mean you have to deny yourself this exquisite pleasure. Below you'll see my version, which has always received rave reviews. These are garnished with smoked salmon, but my favorite way is to simply enjoy them topped with applesauce and sour cream. This is an older post, so use the link below the video for more info and the ingredients. A happy Hanukkah to all those celebrating, and as always, enjoy!


Click here for the original post and ingredient amounts.Pin It Now!

Twice Baked Potatoes - They Take Longer, But At Least They’re More Complicated

To contact us Click HERE
I don’t do a lot of things in the kitchen purely foresthetic reasons, but these twice baked potatoes are one of my more beautifulexceptions to that rule. You can get almost the exact same flavors by justadding stuff to a regular baked potato, but what you won’t get in thatscenario is the impressive, over-stuffed height, and gorgeous, golden-brownedcrust seen here.

Is it worth it? Only you can answer that. For me, once in awhile, for those extra fancy dinners, the answer is a resounding yes. Taste is,and always will be, the most important aspect of cooking, but when entertainingguests on special occasions, don’t forget that you’re putting on ashow with the food. And when it comes to starchy side dishes, this is a greatway to express that flair for the dramatic.
Like I said in the video, this is a demonstration oftechnique, and not necessarily a recipe I want you to follow verbatim. I willlist what I used below, since I’m required to by food blogger common law, but if there was ever arecipe that you’d want to experiment with, this is the one.
By the way, since there's a certain amount of prep involvedhere, you can make these ahead of time, up to the point of the second baking,and then just finish when it gets closer to service. I hope you give this showstopping side dish a try soon. Enjoy!

Ingredients for 4 Twice Baked Potatoes:4 large russet potatoes3 tbsp butter1 or 2 tbsp minced green onionsalt, pepper, cayenne to taste1/2 cup shredded white cheddar cheese1/2 cup cream or milk1 egg yolkBake at 400 degrees F. for an hour to cook potatoes, andthen 20-30 to brown after stuffing.Pin It Now!

Holiday Granola – Only 8 Edible Gift Making Days Until Christmas!

To contact us Click HERE
When I was asked to take part in a special holiday YouTubeplaylist called, “Christmas Morning Breakfast,” I started thinking aboutseasonal variation on things like eggs benedict, quiche, and French toast. Butthen I realized…you can’t wrap those things up and give them as an edible gift,so I decided to do this granola instead.

We’ve covered the edible gift topic before, and discussedthe fine line between, “Wow, what a creative and thoughtful gift!” and “Wow,what a cheapskate!” Happily, when it comes to this delicious, crunchy treat,one taste and the lucky recipient will forget about any ulterior economicmotivations.
Since this was a Christmas-themed recipe, I went with lotsof festively colored dried fruit, but the beauty of the granola technique isthat it pretty much works with anything. I love the looks of the green pumpkinseeds, but things like hazelnuts and pecans would also work wonderfully.
As I mentioned in the video, it’s really up to you todetermine the cooking time. I tend to like mine just golden-brown, but manyenjoy the deeper, nuttier flavor of a longer roasting. Since you are pullingand tossing every 10 minutes, this is pretty easy to monitor, but just becareful towards the end, as it can get bitter if you go too far.
Anyway, whether this is for a quick and easy holidaybreakfast, with milk or over Greek yogurt; or you are going to package some upas a stocking stuffer for the foodies in your life, I hope you give this a trysoon. Enjoy!

Ingredients for about 6 cups of Granola3 cups rolled oats
1 cup sliced almonds
1/2 cup raw pumpkin seeds
1/2 cup shredded coconut (pure coconut, not candied)3/4 cup packed brown sugar
1/2 cup maple syrup
3 tbsp vegetable oil
1 tsp salt1/2 cup chopped candy covered chocolate pieces (like M&M’s)1/2 cup golden raisins, chopped1 cup mixed dried fruit (any combo of cranberries, cherries,strawberries, blueberries, etc.)*Bake at 325 degrees F. for 30-40 minutes or until browned.Pin It Now!

Cumberland Sauce – It Only Sounds Stuffy

To contact us Click HERE
I’ve always wondered why Cumberland sauce wasn’t morepopular around the holidays. It’s such a delicious and versatile condiment, andjust as easy and fast to make as any cranberry sauce out there.  Maybe it’s the name?

Cumberland sauce sounds more like something that the Queenwould be spooning over a Quail en Croute than it does Uncle Charlie over aslice of ham. However, despite this sassy sauce’s upper-crusty sounding name,it’s actually quite rustic.
My “Black Cumberland” version uses black currants instead ofthe traditional red, and also includes some very browned-blackened onions, butlike all similar recipes, this begs for even further adaptation depending onthe meat. Maybe a little mint for lamb, or a touch of cardamom for that smokedduck breast?
Notwithstanding any flavor variations, you will still needto decide whether to serve hot or not. I definitely prefer the thick, shinycooled-down version as shown, but happily, there’s no wrong choice. I hope yougive this extra special holiday sauce a try soon. Enjoy!

Ingredients to make about 1 1/2 cups Cumberland Sauce:
1 tsp vegetable oil
1/2 cup minced onions
1 cup black or red currant jelly zest from 2 oranges and 1 lemon 1/3 cup red wine1/2 cup orange juice2-3 tbsp lemon juice
2 tsp black pepper, or to taste 1 tbsp brown sugar1/4 tsp dry mustardpinch cayenne pepper1/4 tsp ground gingersalt to tastePin It Now!

16 Aralık 2012 Pazar

Pennoni with Chicken Spinach Portabella and Romano Creme

To contact us Click HERE


A nice simple pasta recipe!
     Pennoni pasta is a tube shaped pasta like penne, but the gauge of the pasta is much thinner.  Thinner walls on a tube pasta means that more care must be taken when cooking the pasta, so the pieces of pennoni do not break.  Broken or split tube pasta is frowned upon in Italy.  Overcooked pasta is frowned upon too.     Chicken is not a common pasta ingredient in Italy.  Even Northern Italians prefer other meats beside chicken.  Cream or besciamella sauces are common near the French and Swiss borders, but cream sauces are rarely used in Italian pasta recipes.     American, French and German chefs use cream for pasta sauces quite often.  Italian American restaurants usually offer a couple of cream sauce pastas on the menu.  The reason why, is because cream sauce pastas sell!  Many people like cream sauce pastas.  Cream sauce pastas are easy to make and they can easily be made to order.       Most Italian chefs and traditional classic chefs, including myself, view cream sauce pastas as being just a little bit too easy to make and they can be too rich to serve as pasta course during formal multi course dinner.  Many chefs who are not adept at making traditional Italian pasta sauces or fine French sauces rely on cream sauces to carry their reputation through a day.  For a weak chef, cream sauce pastas can become a crutch.       The worst example of cream sauce pastas are those that are served by franchise chain restaurants.  Most times, the cream sauce at a chain restaurant is made with a package of freeze dried instant cream sauce mix.  That is enough to make a high class Italian chef vomit!  The other mistake that chain restaurants and second rate chefs make is to flood a plate of pasta with way too much cream sauce.  That really is a sign that cream sauces are carrying the chef through a day.      The basic Italian rule for saucing pasta is to only make enough sauce to coat the pasta with flavor.  That also applies to cream sauces.  As you can see in the photographs above, the thin cream sauce barely coats the pasta and the excess sauce sits under the pasta.  The sauce is not thick or gloppy.  The plate is not flooded with sauce!       Even though Italian chefs do not use chicken in fine dining and cream sauces are rarely used for pastas, this bowl of pasta would be eye pleasing to an Italian chef.  When I have cooked a pasta like this in the past, when working with Italian chefs, Italian chefs look and say "That is okay."  The words "That is okay" are about as close to a compliment that a pasta like this will get from a traditional Italian chef.  On the other hand, an elderly lady from middle of the road America would rave about how much she likes this pasta.      The moral of the story is, sometimes a traditional chef has to "sell out" and offer an item that the clientele can easily like, for the sake of profit, rather than tradition.  A crowd pleasing item on a menu is just that.  The token cream sauce pasta or chicken entree on an Italian restaurant menu is usually a crowd pleaser that is not traditional, but it tastes good and it appeals to the middle of the road customers.
     Pennoni with Chicken Spinach Portabella and Romano Creme:     The sauce for this pasta is a la minute.  A besciamella sauce is not made ahead of time for this recipe.  The sauce is a simple reduction of romano cheese and cream.  This is the easiest of all cream sauces to make.  However, it is also easy to reduce the sauce too far and it will become too thick and rich.     Cook 1 portion of pennoni pasta in boiling water, till it becomes al dente.  The sauce can be made while the pasta cooks.     Heat a saute pan over medium heat.     Add 1/2 tablespoon of olive oil.     Add 1 pat of unsalted butter.     Add 4 ounces of coarsely chopped chicken breast.     Saute till the chicken pieces become more than halfway cooked.     Add 1 minced garlic clove.     Add 1 teaspoon of minced shallot.     Add 2 small portabella mushrooms that are cut into small wedges.     Saute till the mushrooms start to become tender.     Add 1 cup of cream.     Add sea salt and black pepper.     Bring the cream to a gentle boil.     Reduce the temperature to low heat.     Add 3 tablespoons of finely grated romano cheese, while stirring.     Stir till the cheese melts and becomes part of the sauce.       Add 1 handful of baby spinach leaves.     Stir the spinach into the sauce as the leaves wilt.     Simmer and reduce the sauce, till it becomes a thin cream sauce consistency.     Keep the sauce warm over very low heat.     When the pasta becomes cooked al dente, drain the water off of the pasta.     Add the pennoni pasta to the sauce.     Toss the sauce and pasta together.     Place the Pennoni with Chicken Spinach Portabella and Romano Creme into a shallow pasta bowl.     Sprinkle a couple pinches of finely grated romano cheese over the pasta.     Garnish with an Italian parsley sprig.
     This is not a traditional Italian pasta, but it is a nice pasta entree that has an appealing flavor.  Yum!  ...  Shawna